There are many different standard door sizes available in the UK and understanding the measurements can often become quite confusing. JB Kind Doors offer a core selection of the most common door sizes from stock.
UK standard door sizes
- 1981 x 457/533 x 35mm – door sizes tend to be most popular for use as cupboard or wardrobe doors.
- 1981 x 610/686 x 35mm – door sizes are used where the wall space may be restricted and a smaller door is required.
- 1981 x 762 x 35mm – often referred to as a 2’6” door is the most common internal door size in England and Wales.
- 1981 x 838 x 35mm – in most circumstances provides the required opening width for wheelchair access under the Part ‘M’ mobility requirements. You may also hear this door size being referred to as a 2’9”.
Metric standard door sizes
Metric-sized internal doors are becoming increasingly popular and are most commonly used in Scotland and Europe. The main difference is an increased door height of 2040mm and door thickness of 40mm.
- 2040 x 526/626/726/826/926 x 40mm
Fire door standard sizes
All of the standard UK and metric door sizes are usually available as a fire door equivalent with the only difference being an increased door thickness of 45mm. This is because extra core component materials are required in the construction of the door to achieve its’ fire rating. Remember to check that your frames, intumescent seals and ironmongery also comply with the door’s fire certification.
Door size conversion chart
Please see below our helpful door size conversion chart. If you still work in feet and inches, the chart will help you work out the metric equivalent size of our doors.

JB Kind’s pocket door systems are easier to install than most alternative brands on the market, fitted quickly and in half the time. Supplied pre-assembled, the cassette structure does not come in a complicated kit format, so within just a few steps the pocket frame can be installed!
Here is a step by step video guide that shows how JB Kind fitted a double pocket door system into their Door Showroom
Additional benefits of JB Kind’s pocket door system include a protection plate that covers the pocket cavity during installation, keeping it free from the dust and dirt that is inevitable in a build environment. Plus the door can be fitted after all installation and decoration has been completed, avoiding any potential damage. This also means that you will have the flexibility to change your door choice in the future without any structural changes to the wall.
Single Pocket Door System Installation guide
Here is a guide to help explain the key steps involved when fitting a JB Kind single pocket door system. Please note that detailed fitting instructions are supplied with all of our pocket door systems upon delivery.
JB Kind’s pre-assembled pocket door system is designed to be fitted within a stud wall with plasterboard, achieving a finished wall thickness of 125mm.
Step 1: Preparation
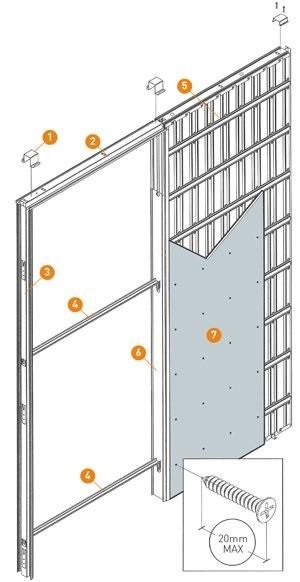
Allow yourself plenty of room to unpack the system. Take time to read through the instructions and familiarise yourself with the component parts. Slide off the protection plate (6), remove the packages that contain fixings and then replace.
There are a number of tools that will help you assemble the system, including a spirit level, mallet and drill. Please remember to wear gloves, as some of the component parts can be sharp.
Step 2: Assembly of the pocket system
Take the aluminium header rail (2) and clip on the U shaped brackets (1). Later, these brackets will fix onto the wooden stud head. The header rail (2) then slides into the top of the pocket cassette (5). Make sure that the cassette is square with the header rail and that all tabs are located within the grooves.
The metal jamb (3) should now be fixed to the top of the header rail (2).
Now position the two spacer bars (4) between the protection plate (6) fixed on the cassette and the metal jamb (3). The ends of each bar are bent down 90 degrees and slot into the notches. These spacers are provided to keep the structure square during installation.
If fitting double pocket doors:
You will need the double leaf conversion kit with two single pocket door systems. The metal jambs (3) are not required and can be discarded. The double top rail supplied is fixed between the two single systems. Double spacers are also provided to keep the structure square.
Step 3: Fixing pocket system into cavity wall and stud frame
Make sure that everything is square and use packers if required. Screws are fixed through the studwork into the pocket cassette to secure it into place. When you are happy that the system is square and plumb, you can remove the spacer bars.
Ensure that the header bar is absolutely square and screw it into place through the U shaped brackets, packers can be used if required.
Step 4: Fitting Plasterboard
Plasterboard (7) can be fixed directly to the horizontal bars on the cassette using the self tapping screws provided. Decoration can then be completed before fitting the doors.
Step 5: Preparing the door
To prevent debris entering inside the pocket cavity, it is protected by a cover plate during installation. When you are ready to fit the doors, this plate can be removed. The door fitting accessories are stored inside but you may have removed these during Step 1.
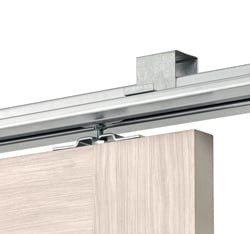
The door has two wheel carriages that run inside the header. Fit the bolts into the carriages. These bolts will slot into two metal plates that are fixed on top of each door.
So that the doors do not bang when opened, fit the rubber bumpers onto the back edge of the doors.
You will need to cut a groove, 20mm by 6mm into the bottom edge of the door, so that it fits into the floor guide.
We recommend fitting the pocket door ironmongery at this stage, as it will be very difficult to do so, once insitu.
Step 6: Fitting the Door
The door is now ready to be fitted. First screw the floor guides into the cassette, then lift the door into position. It may help to place the door on packers. Slide the bolts into the plates and adjust as required to make the door level. The door should now slide smoothly in and out of the cassette.
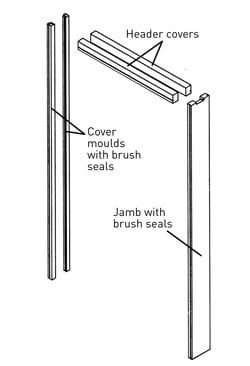
Step 7: Fitting the Timber Accessory Kit

Timber accessory kits are available in either oak or white primed and should be fitted after all work is complete. Take the cover moulds and insert the brush seals, then cut to the required size. We suggest fixing in place with silicone.
The timber jamb has rubber seals that need inserting and along with the head covers, will also need cutting to size and then either screwed or glued into position. We suggest screwing (rather than gluing) at least one of the headers into position, to avoid damage in case you ever need to remove the door for remedial work.